

TPour the contents of a bag of “uncleaned Roman coins” onto a table and what you see does not look like history.
You see lumps of dirt. Small dark disks coated in grime. The occasional green-tinged pebble that might once have been a coin, or might still be just a pebble. Nothing glamorous. Nothing obviously imperial. Just dirt.
And somewhere inside those lumps — maybe one, maybe twenty, occasionally all of them — are the faces of Roman emperors who died 1,700 years ago. The only way to find out is to get to work.
This is the uncleaned coin hobby. For many collectors, it is the most addictive form of ancient numismatics — part archaeology, part lottery, part meditation on patience. For a few dollars per coin, you get the chance to be the first person in seventeen centuries to see what the dirt has been hiding.
But it is also a hobby with real risks. Every coin you clean poorly is a small artifact destroyed forever. This guide will help you approach the task with realistic expectations, proper techniques, and the patience the hobby demands.
What’s Actually in an Uncleaned Lot

The vast majority of uncleaned coins on the market today are late Roman bronzes from the fourth century AD. The reasons are practical and historical.
In the late empire, emperors produced staggering quantities of small bronze coinage — the folles and smaller AE3/AE4 denominations that dominated daily commerce. By some estimates, the fourth-century Roman state struck billions of these coins across its many mints. Most ended up buried — lost in the dirt of a market floor, stashed in a pot before a barbarian invasion, dropped on a road and forgotten. The more chaotic a region’s history, the more coins it holds.
Europe, the Balkans, and the eastern Mediterranean hold the bulk of these losses. Agricultural soil in these regions still turns up ancient coinage in enormous quantities, recovered today by metal detectorists and legitimate local excavators. The sheer abundance is why late Roman bronzes remain affordable — unlike the gold aurei of the early empire, which survive in tiny numbers and command serious money, fourth-century bronzes are numerous enough that ordinary collectors can own them.
What you’re likely to find:
Rare surprises — provincial Greek bronzes, Byzantine folles, pre-Roman Celtic coins, or in rare cases silver denarii and antoniniani
Small thin bronze coins from the fourth century — tiny successors to the Constantinian-era folles, often only 12–18 mm in diameter
Coins of Constantine I and his sons — Constantius II, Constans, Constantine II
Coins of the House of Valentinian — later fourth-century rulers whose bronzes flooded the provinces
Occasional earlier pieces — a Diocletian follis, a Constantius I Chlorus follis, a Maximianus Herculius tetrarchic issue
The most common reverse types you’ll find — and learning to recognize them is part of the fun — include:
- Fel Temp Reparatio (“Restoration of Happy Times”) — often showing a fallen horseman, as on the Constantius II “Fallen Horseman” Follis
- Gloria Exercitus (“Glory of the Army”) — two soldiers standing beside military standards, as on the Constantine I Follis with Two Soldiers or the Constantine II Follis
- Campgate types — architectural depictions of fortress walls and towers, like the Constantine I Campgate Follis
- VOT / VOTA issues — commemorative vows marking specific anniversaries of an emperor’s reign
- Genius of Rome — a standing figure representing the spirit of the imperial capital, seen on the Galerius Follis of Genius and the Constantius I Chlorus Follis
Setting Realistic Expectations
Before you start, be honest with yourself about what you’re going to find.
Most coins will be common. A typical bulk lot contains 70-80% coins of extremely common late Roman emperors in moderate-to-poor condition. These are not valuable individually, but they are genuine Roman artifacts with real historical weight.
Some coins will be unreadable. Even careful cleaning cannot restore a coin that has been too badly worn, corroded, or chemically attacked. You will occasionally end up with a clean, smooth piece of metal with no detectable design. These are called “slugs,” and they come with the territory.
A few coins will surprise you. Most collectors who work through a bag of uncleaned coins find at least one or two pieces that clean up beautifully — sharp portraits, clear inscriptions, good patina. These are the reward moments.
Gold is not realistically possible. Some sellers imply you might find gold in uncleaned lots. You won’t. Gold doesn’t corrode; the moment a detectorist’s coil passes over it, the coin shows bright through the dirt. Gold is never sold in bulk uncleaned lots. If a seller is hinting at it, they’re misleading you.
Silver is possible but rare. A silver denarius or antoninianus can occasionally turn up in uncleaned lots — perhaps one coin in several hundred. Silver shows itself faster than bronze, because it’s less affected by burial chemistry and retains more of its original metal. When you find an encrusted silver coin still wearing its soil, that’s a genuine thrill.
The economics are what they are. A bulk lot might cost $1–3 per coin. If you clean fifty coins and find one good Constantine I you’d otherwise have paid $15 for at a dealer, you’ve broken even. If you find nothing memorable, you’ve still held fifty ancient Roman artifacts in your hands and spent a few evenings in patient, focused work. That’s the deal.
Cleaning ancient coins is a test of patience. Rush the process, and you risk destroying a beautiful patina (the protective “skin” the coin develops over centuries). There are three main types of coins you’ll encounter:

The Rule Before Anything Else
Before you touch a coin, understand this:
Every cleaning choice is potentially destructive.
An ancient bronze coin has spent 1,700 years acquiring a stable mineral surface — a patina that protects the metal beneath and carries the record of the coin’s history. Aggressive cleaning strips this layer. Once stripped, it cannot be restored. A stripped bronze coin will:
- Look unnaturally bright, like a modern replica
- Be more vulnerable to future corrosion (including bronze disease)
- Lose 50–90% of its value compared to a coin with intact stable patina
- Lose much of its visual appeal, because ancient detail is best revealed by contrast between high points and dark recesses
Your goal when cleaning an uncleaned coin is not to reveal bare metal. Your goal is to gently remove the loose soil and loose crust while preserving the stable patina beneath.
This is the most important sentence in this post. Internalize it before you touch a single coin.
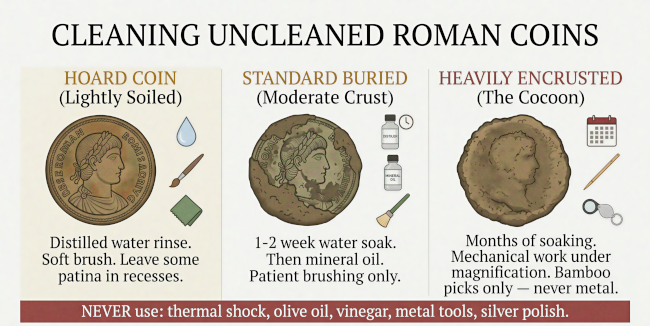
The Approach — Three Types of Coin, Three Techniques
Not every coin in a bulk lot needs the same treatment. Look at each coin individually before deciding what to do.
Type 1 — The Lightly Soiled Coin (from a Hoard)
Some coins come from ancient hoards — buried stashes in clay pots or sealed containers that protected the coins from direct soil contact. These coins often have only a thin layer of dust over a stable, beautiful patina.
Signs you have one of these: Dust-like coating rather than hard crust. Patina visible through the dirt. Design partly readable before any cleaning. These are often fresher-looking than other coins in a lot.
How to clean: As little as possible. Rinse gently with distilled water (never tap water — the chlorine and minerals will accelerate future corrosion). Use a soft natural-bristle brush, not a stiff one. Pat dry with a lint-free cloth. Air-dry for 24 hours before storage.
Many experienced collectors deliberately leave some soil in the recesses of the design. This creates visual contrast — the raised portrait sits against a darker background — and the coin looks more archaeological, more authentic. A cleaned-to-bare-metal ancient coin almost always looks worse than one with some residual patina.
Type 2 — The Standard Soil-Buried Coin
These are the majority of uncleaned coins — individual pieces lost in dirt that’s now hardened around them. The soil has reacted with the metal over centuries, producing a layer of grime that’s bonded chemically to the patina.
How to clean: Distilled water soak, changing the water every 24-48 hours, for one to two weeks. This slowly softens and releases the looser material. After each water change, gently brush with a soft nylon or natural-bristle brush under running distilled water. Do not scrub. Do not use metal tools at this stage.
If the distilled water alone isn’t making progress after two weeks, you can move to a light mineral oil soak for several weeks. Mineral oil (not olive oil — see warning below) can soften stubborn deposits without attacking the patina. Some collectors use mineral oil exclusively and achieve fine results over months of patient soaking.
⚠️ Don’t use olive oil. Despite being widely recommended in older guides, olive oil (and other food-grade oils) can turn rancid over time, creating organic acids that slowly damage coins. Most modern conservators have moved to mineral oil or specialized commercial products like Verdi-Care. If you’ve already started an olive oil soak, transition the coins to mineral oil as soon as practical and rinse them thoroughly.
Type 3 — The Heavily Encrusted Coin (“Cocoon”)
Some coins are buried so deeply in hard mineral deposits that they look like small pebbles. These are the most challenging pieces in any uncleaned lot, and they require the most patience.
How to clean: Long water or oil soaks (months, potentially), followed by careful mechanical work under magnification.
Mechanical cleaning uses hand tools — usually a wooden toothpick, bamboo skewer, or very fine bone pick — to gently lift crust away from the coin. Never use metal picks for general cleaning; metal tools will scratch the patina. A 10x jeweler’s loupe or a stereo microscope helps enormously. Work a tiny area at a time. Brush loosened material away frequently. Stop the moment you reach stable patina.
⚠️ Avoid thermal shock techniques. Some older guides recommend freezing a coin and then plunging it into boiling water to crack the crust by thermal expansion. Don’t do this. Ancient bronze is often porous or brittle, and thermal shock can crack the coin itself, not just the crust. You can go from a salvageable encrusted specimen to a cracked piece of worthless metal in seconds.
⚠️ Be cautious with the glue trick. A technique some hobbyists use is to apply a layer of Elmer’s (PVA) glue to the coin, let it dry completely, and then peel off the glue layer along with loose crust. This works on some coins. On others, it strips the patina along with the glue, leaving the coin dull and unnaturally bright. If you decide to try this, test it on a low-value coin first and accept that you may lose the patina.
When to Stop
The hardest skill in cleaning uncleaned coins is knowing when to stop.
If you keep working at a coin long enough, you will eventually reach bare metal. The coin will be shiny, bright, and look nothing like what it was supposed to look like when you started. You will have “cleaned” it beyond recognition — and in so doing, you will have destroyed everything that made it an ancient coin rather than a shiny piece of copper.
The correct stopping point is when you can read the coin’s design. Not when the coin is shiny. Not when all the dark areas are gone. The moment the emperor’s portrait is identifiable, the inscription is legible, and the reverse design is clear — stop. Whatever stable patina remains is part of the coin’s history. It was there when you started. It should be there when you finish.
After cleaning, dry thoroughly. Consider applying a thin coat of microcrystalline wax (Renaissance Wax is the standard) to seal the coin against future moisture and protect whatever patina you preserved.
Storage After Cleaning
Cleaned coins are vulnerable coins. The patina layer has likely been thinned by your work, and any remaining chloride contamination in the metal can reactivate if conditions allow (see our post on bronze disease for why this matters).
Store cleaned bronzes in:
- Acid-free paper envelopes or Mylar (polyester) coin flips
- Never PVC flips — these release hydrochloric acid as they age, which is exactly what you’re trying to avoid
- Low humidity — below 40% is ideal, measured with a cheap digital hygrometer
- With silica gel desiccant if your climate is humid
- In a cool, dark place — away from direct sunlight and temperature swings
Check your cleaned coins every few months for the first year, especially if you live in a humid climate. Any sign of bright green powder — different from the darker stable patina — is a warning of active corrosion and needs immediate attention.
The Real Reward
The uncleaned coin hobby is not really about the coins. A $1 late Roman bronze that you clean over three weeks of patient evening work is not an investment. It is barely even a collectible in the traditional sense.
What you’re buying is the experience. The slow uncovering. The moment when the outline of an emperor’s nose suddenly emerges from what looked like a lump of dirt. The discovery that the coin you’ve been working on is actually something you’ve never seen before. The long hours at a desk, under a lamp, doing delicate careful work that has no deadline.
For some people, that’s a form of meditation. For others, it’s a deeply satisfying hobby that connects them to history in a way that buying an already-authenticated, already-cleaned coin from a dealer cannot.
But take the work seriously. Every coin you clean badly is a small object destroyed forever — an object that was made in AD 335, held by a Roman soldier, lost in a field, and carried through seventeen centuries to reach your desk. You are the current custodian. The last one in a long chain.
Be gentle with it.
To see beautifully-preserved examples of the types of Roman coins common in uncleaned lots, browse the collection, particularly the late Roman folles. For deeper context on Roman coinage, see our guides to Roman coin denominations, how ancient Roman coins were made, and understanding ancient patina. To protect your finds from the most dangerous form of corrosion, read our guide to bronze disease.

