

Search the internet for “how to clean ancient Roman coins fast” and you will find a lot of enthusiastic guides to a technique called electrolysis — the use of a small electrical current in salt water to rapidly strip dirt, crust, and corrosion from an old coin.
The pitch is seductive. Instead of the months-long soaks in distilled water or oil that careful coin cleaning requires, electrolysis can pull crust off a coin in minutes. A 1,700-year-old piece of bronze that has been hiding under a concrete layer of mineral deposit can, with the right DIY setup, be visible again before you finish your coffee.
The problem is what the pitch leaves out.
Professional conservators, experienced numismatists, and serious ancient coin dealers almost universally advise against using electrolysis on ancient coins. Not because it doesn’t work — it does — but because of what it does to the coin in the process of working, and because of what the coin looks like when you’re done. Before you plug in the alligator clips, it’s worth understanding why.
This post will walk you through what electrolysis actually does to an ancient coin, when (if ever) it might be justified, and what the safer alternatives are.
What Electrolysis Actually Does
The chemistry is straightforward. When you pass an electrical current through salt water containing an ancient bronze coin, several things happen simultaneously:
- Hydrogen gas is released at the cathode (where your coin is attached), creating the bubbling effect that produces the visible “fizzing”
- Chlorine gas is released at the anode — this is important, and the original how-to guides tend to downplay it
- Mineral deposits and corrosion products are chemically reduced and lift off the coin’s surface
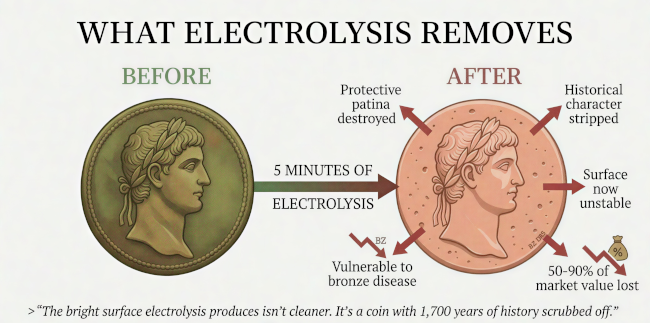
- The stable patina layer is attacked alongside the crust, because the current cannot distinguish between destructive corrosion and the protective mineralized surface that took centuries to form
That last point is the critical one. Electrolysis is not a precision tool. It works by aggressively reducing copper oxides across the entire surface of the coin — which includes the patina layers that protect and define an ancient bronze. There is no “cleaning setting” that removes dirt but preserves patina. The current treats everything the same.
What emerges from an electrolysis bath is usually a bright, coppery, somewhat pitted surface. Sometimes details that were hidden beneath the crust are now visible. Sometimes the details weren’t there to begin with, and the coin is revealed to be a worn “slug.” Often, what was a stable ancient artifact has become an unstable freshly-exposed piece of copper that will begin oxidizing again the moment air hits it.
If you want to understand more about what the patina layer is and why conservators protect it, see our post on understanding ancient coin patina.
Why Serious Collectors Avoid It
The reasons run deeper than just “patina matters.”
1. The result looks wrong. An electrolysed ancient coin often has a distinctive appearance, a flat, dead “copper pink” surface that experienced collectors learn to recognize at a glance. It doesn’t look like a genuinely clean ancient coin. It looks like a coin that’s been processed. For any coin you might eventually sell or pass on, this is value lost forever.
2. The chemistry doesn’t stop when you unplug. Electrolysis can leave chloride compounds in and on the coin’s surface. Combined with the now-unprotected bare metal, this creates perfect conditions for bronze disease, the self-sustaining chloride-driven corrosion that can destroy ancient bronzes. You haven’t saved the coin; you’ve created a new, more dangerous problem.
3. It’s genuinely dangerous to people. The original how-to guides that recommend “a well-ventilated area” often understate the actual hazard. Electrolysis of saltwater releases chlorine gas (same compound used in World War I poison gas attacks, though at far lower concentrations in a hobby setup). Even small exposures can irritate the lungs and eyes. If you have children, pets, or any respiratory conditions in the household, this isn’t a basement-hobby technique.
4. The process is irreversible. A coin you accidentally over-cleaned with electrolysis cannot be put back the way it was. Compare this to a distilled water soak, which can be stopped at any time and causes no chemical damage. Electrolysis forecloses future options.
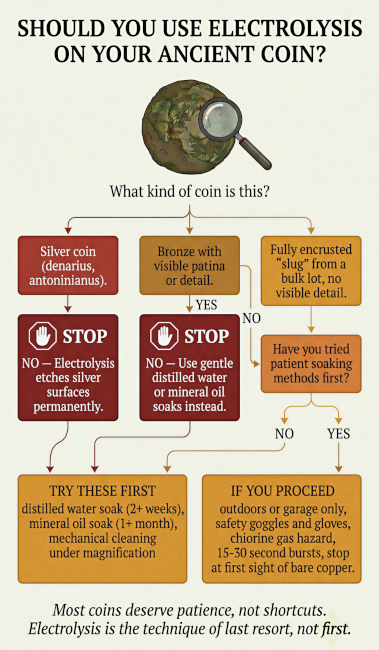
5. Silver coins are particularly vulnerable. Electrolysis can visibly etch the surface of silver coinage, producing micro-pitting that destroys the fine details struck by ancient dies. For denarii, antoniniani, or any silvered bronzes, electrolysis is simply a bad idea.
When Might It Be Justified?
There is a narrow window of cases where electrolysis might be a defensible choice:
A mass of fused “slugs” from a bulk uncleaned lot. Some uncleaned lots include coins that are so thoroughly corroded they can be identified as essentially unrecoverable. If you’ve already spent months in distilled water and mineral oil soaks with no progress, and the coin shows no detail whatsoever, electrolysis might reveal whether there’s anything left worth finding — with the understanding that the answer is often “no, there isn’t, and now the coin is also visibly processed.”
Coins with no historical value that you’re practicing on. If you’re learning mechanical cleaning techniques and want to experiment, electrolysis on a handful of worthless modern copies or the cheapest possible unreadable slugs is a way to see the process and understand its effects before committing to more careful work on better coins.
Absolutely nothing else. For any coin with visible detail, any coin with stable patina, any silver coin, any coin with documented type, any coin you bought rather than salvaged from a bulk lot, any coin you’d be upset to ruin — electrolysis is the wrong tool.
Safer Alternatives for “Uncleanable” Coins
Before reaching for the electrical approach, consider the alternatives that experienced collectors actually use on heavily encrusted coins:
Long mineral oil soaks. Weeks to months in mineral oil (not olive oil, that turns rancid and produces organic acids). The oil slowly penetrates and softens mineral deposits without attacking the underlying patina. Patient but effective.
Repeated distilled water cycles. Changing the water every 24-48 hours over weeks or months can gradually dissolve and lift away softer deposits. Doesn’t work on truly hard crusts, but works well on moderate encrustation.
Mechanical cleaning under magnification. With a 10x loupe, a set of wooden or bamboo picks, and patience, you can remove crust tiny area by tiny area without chemical intervention. This is the standard technique for serious conservators. It’s slow, but it’s reversible if you make a mistake (stop, back off, try a different approach).
Professional conservation. For a coin that matters — a rare variety, a personal inheritance, anything of significant value, a professional archaeological conservator can do things you cannot do at home. It isn’t cheap, but it produces genuinely excellent results and preserves the coin for future owners.
For a complete walkthrough of careful cleaning techniques on uncleaned coins, see our post on cleaning uncleaned ancient Roman coins.
If You’re Going to Do It Anyway
If, despite all of the above, you’ve decided to try electrolysis on a low-value coin you’re willing to potentially destroy, at least do it with proper safety precautions.
Workspace setup:
- Work outdoors or in a garage with doors wide open. Not indoors. Not in any room where anyone is breathing.
- Keep children and pets completely away from the work area
- Have ventilation air moving through the space continuously
- Wear chemical-resistant safety goggles (not ordinary reading glasses)
- Wear nitrile gloves
- Keep a towel available for quick drying
Equipment:
- A low-voltage DC power supply (6-12V) from an old wall adapter, never AC mains power
- Alligator clips (non-copper, to avoid transferring copper color to your coin)
- A plastic or glass container — never metal
- A sacrificial anode of stainless steel, not copper or brass
- Non-iodized table salt for the electrolyte (iodized salt produces additional undesirable byproducts)
Process:
- Work in short bursts — 15-30 seconds, not minutes
- Rinse and inspect the coin after every burst
- Stop immediately when you see bare copper emerging, or when the coin feels warm
- Do a final thorough rinse in distilled water to remove all traces of salt
- Dry completely (moisture plus residual chloride triggers bronze disease)
- Apply a microcrystalline wax coating (Renaissance Wax or equivalent) to seal the surface after drying
The goal, if you have to do this, is minimum intervention — not maximum cleaning. Stop early. Stop often. Stop the moment you have any detail visible at all. The temptation to “go a little further” is exactly how coins get destroyed.
A Note on the Ethics of Re-Patination
Some electrolysis guides recommend artificial “re-patination” after stripping a coin using chemical agents (often liver of sulfur or other sulfur compounds) to produce a dark, aged-looking coating on the bare metal that emerges from the bath.
This is essentially antiquing: creating a fake patina on a coin that has just had its real one destroyed.
For personal use — a cleaned coin you want for your own collection that you’d like to look less jarring, this is a matter of taste. But a re-patinated coin sold without disclosure is misrepresented as having its original patina, which crosses a clear line. If you re-patinate a coin, document what you did so that future owners know the surface is modern.
The Broader Question
Electrolysis is, in many ways, a symbol of a particular approach to ancient coin collecting — the approach that prioritizes getting a visible coin quickly over preserving the historical object. It’s the approach that generates YouTube videos titled “AMAZING before and after!” showing bright shiny coins that were, a minute earlier, authentically-patinated ancient artifacts.
The alternative approach is patience. Long soaks. Gentle mechanical work. Leaving stable patina alone. Accepting that some uncleaned-lot coins won’t yield readable details, and that’s okay — you still spent a few dollars on a genuine ancient Roman artifact that you worked on with your hands.
The patient approach produces coins that are worth more, look better, and preserve history more faithfully. It’s also more rewarding as a hobby — the slow reveal of an emperor’s portrait over weeks of careful work is more satisfying than the fizzing rush of electrolytic stripping.
If you’re new to the hobby and wondering whether to try electrolysis: almost certainly no. There are better ways to learn, and most of the coins you might want to “electrolyse” are coins that will eventually clean up beautifully with more patient methods.
If you’re experienced and know exactly what you’re doing: you probably already know that the conservation community’s consensus on this technique is clear. The clips and the wires are a shortcut. The shortcut has costs.
To understand what patina is and why it’s worth protecting, see our guide to understanding ancient coin patina. For safer, patient techniques on heavily encrusted coins, see our guide to cleaning uncleaned ancient Roman coins. For the most destructive form of corrosion that electrolysis can accidentally trigger, see our post on bronze disease. To store your cleaned coins properly afterward, see our guide on preserving ancient coins.

